Introduction
Welcome to the Merchant Dashboard Comprehensive Guide. This guide is designed to help you navigate and utilize all the features of the Merchant Dashboard effectively. The dashboard allows you to manage your transactions, batches, funding, authorizations, statements, and more—all in one place.
TABLE OF CONTENTS
- Navigation Toolbar
- Customize Which Merchant(s) to Display
- Funding
- Batches
- Transactions
- Notifications
- User Management
- Frequently Asked Questions
- What is the main purpose of the Merchant Dashboard?
- Can recurring payments be managed from the Merchant Dashboard?
- What does the term "MID" refer to?
- What do the terms "settlement," "chargeback," and "reserve" mean?
- Why is there a reference number for deposits?
- What is the purpose of the terminal ID field?
- Why isn't the transaction ID from the receipt visible in the reports?
- What do the different entry modes indicate?
- How can you dispute a chargeback?
- Can you export data from the Merchant Dashboard?
- How can you handle user permissions and access levels?
- Can you explain the funding section and its components?
- How are reserves managed in the Merchant Dashboard?
- What does the "CP" batch number prefix mean?
- How can you identify specific transactions or batches using the terminal ID?
- What information is available for dispute handling?
- How can you get updates on the status of disputes?
- What should you do if you encounter issues with searching for order IDs?
- How can you add new users and manage their permissions?
- Is the Merchant Dashboard mobile-optimized?
Navigation Toolbar
The toolbar helps you navigate through various sections of the dashboard.
Options on the Navigation Toolbar
- Funding: Information on funding events.
- Batches: Overview and details of all batches processed.
- Transactions: View and manage all transactions.
- Authorizations: Access details of transaction authorizations.
- Disputes: Manage and track dispute cases.
- Statements: Access your statements.

Customize Which Merchant(s) to Display
You can customize the view of your dashboard by selecting specific merchants and creating groups for quick access.
Customize Your Merchant Display
- Selecting Merchants: Choose which merchants’ data to display.
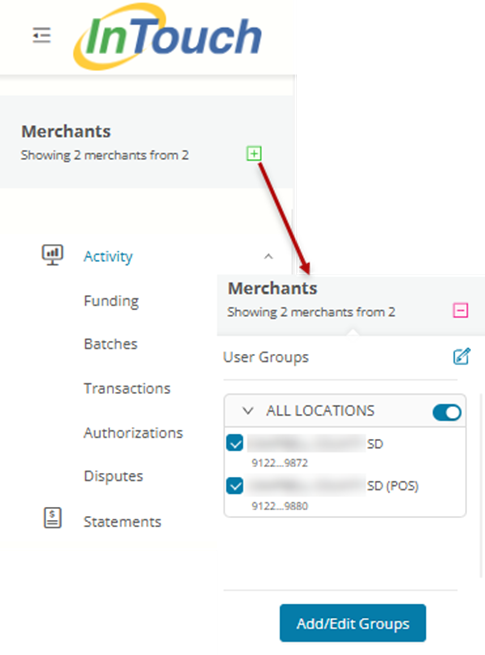
- Creating Groups: Organize merchants into User Groups within the Merchant Dashboard for easier management.

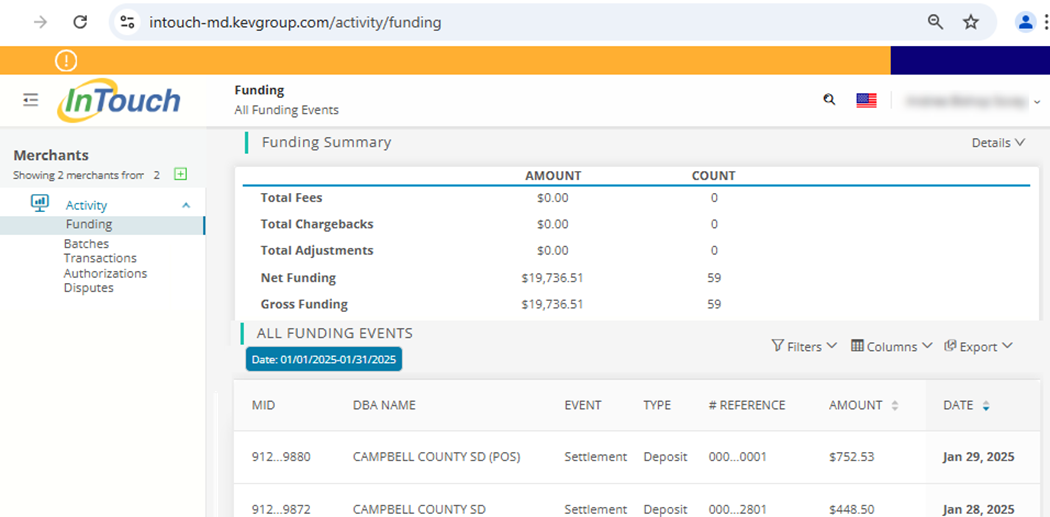
Funding
The Funding section provides a summary and detailed view of your funding events.
Understand Your Funding Events
- Funding Summary: Overview of fees, chargebacks, adjustments, net funding, and gross funding.
- All Funding Events: Detailed list of all funding events with options to filter, export to CSV, and customize views.
Batches
In the Batches section, you can view all batches and terminal IDs for the current month.
Understanding Batches
- Batch Details: Access all data within each batch including card details, amounts, card types, and transaction dates.
- Customization Options: Filter, export to CSV, and select specific columns to display.

Transactions
The Transactions section lists all transactions for the current month.
How to Review Your Transactions
- Transaction Details: View detailed information for each transaction.
- Customization Options: Filter, export to CSV, and select specific columns to display.

Notifications
How to Set Up Email Notifications
InTouch Merchant Dashboard users can opt in to the following email notifications from within InTouch Pay: Batch Notifications and Chargebacks Notifications.
- Log into InTouch Pay at https://app.intouchpay.com/signin.
- Click on your name in the top left corner.
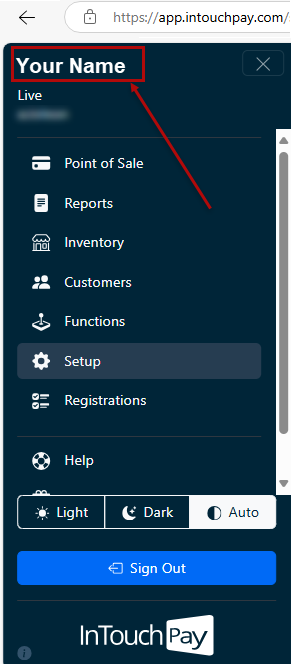
- Check boxes for Batch Notifications and Chargeback Notifications
- Click Save button

User Management
Learn about User Management
Adding a New User
- At the upper right of your screen, select your name and choose Manage Users.
- Click on Add New User.

- Enter the user’s details: First Name, Last Name, Email Address, Phone Number (optional), and set User Status to "Active".
- Assign the user to a merchant by selecting the merchant and moving it to the Assigned Merchants section.
- Set the user’s permissions by selecting the appropriate access levels or choose Allow All for full permissions.
- Click Submit to create the new user.
Updating Your Account Information
- Log on to Merchant Dashboard.
- At the upper right, select your name and choose Account Settings.
- Update your First Name, Last Name, Email Address, and Phone Number as needed.
- Click Submit to save changes.
- Note: The Account Role and User Status can only be updated by an administrator.
Changing Your Password
- Log on to Merchant Dashboard.
- At the top right, click on your name and select Change Password.
- Enter your current email address and current password.
- Enter and confirm your new password.
- Click the Change your password button to save changes.
Logging Off
- At the top right of your screen, click on your name.
- Select Logout from the user menu.
Editing an Existing User's Account
- At the upper right of your screen, select your name and choose Manage Users.
- Click the pencil icon to edit user’s account.

- Edit the user’s details: First Name, Last Name, Email Address, Phone Number (optional), and "Active" status.
- Edit the user’s merchant assignment(s) by selecting the merchant(s) and moving them to the left box to remove access, and to the right box to allow access.
- Set the user’s permissions by selecting the appropriate access levels or choose Allow All for full permissions.
- Click Submit to save user’s settings.

Frequently Asked Questions
Below are answers to some common questions about the Merchant Dashboard.
Frequently Asked Questions
What is the main purpose of the Merchant Dashboard?
The Merchant Dashboard provides a comprehensive overview of transactions, settlements, chargebacks, and reserves. It allows you to manage and track payment-related activities efficiently.
Can recurring payments be managed from the Merchant Dashboard?
No, recurring payment management is handled from within InTouch Pay, not on the Merchant Dashboard.
What does the term "MID" refer to?
"MID" stands for Merchant ID, which represents different locations or accounts within the Merchant Dashboard. Each MID is used to track settlements and other financial activities for that specific location.
How can you group multiple MIDs for a quick view?
You can create MID groups by clicking the + sign under the Merchants heading in the navigation menu, then clicking the Add/Edit Groups button. This allows you to view information for multiple MIDs collectively.
What do the terms "settlement," "chargeback," and "reserve" mean?
- Settlement: Money deposited into your account.
- Chargeback: Money debited from your account due to a disputed transaction.
- Reserve: Money held in a separate account, usually due to account setup or risk management issues.
Why is there a reference number for deposits?
The reference number helps distinguish between multiple deposits made on the same day for the same MID, making reconciliation easier.
What is the purpose of the terminal ID field?
The terminal ID identifies the specific terminal or lane where a transaction was processed. This is useful for troubleshooting and understanding which terminal was used for particular transactions.
Why isn't the transaction ID from the receipt visible in the reports?
The transaction ID from the receipt, also known as the authorization code or order ID, will be made available in future updates to the reports to provide a valuable audit trail.
What do the different entry modes indicate?
Entry modes describe how a card transaction was processed:
- Card Present: Transaction was done at a physical location.
- Key Entry: Transaction was manually entered, typically for eCommerce sales.
- Contactless: Transaction was completed using a tap-to-pay method.
How can you dispute a chargeback?
To dispute a chargeback:
- Log into InTouch Pay at app.intouchpay.com.
- On the Navigation menu, select Functions.
- Select Chargebacks.
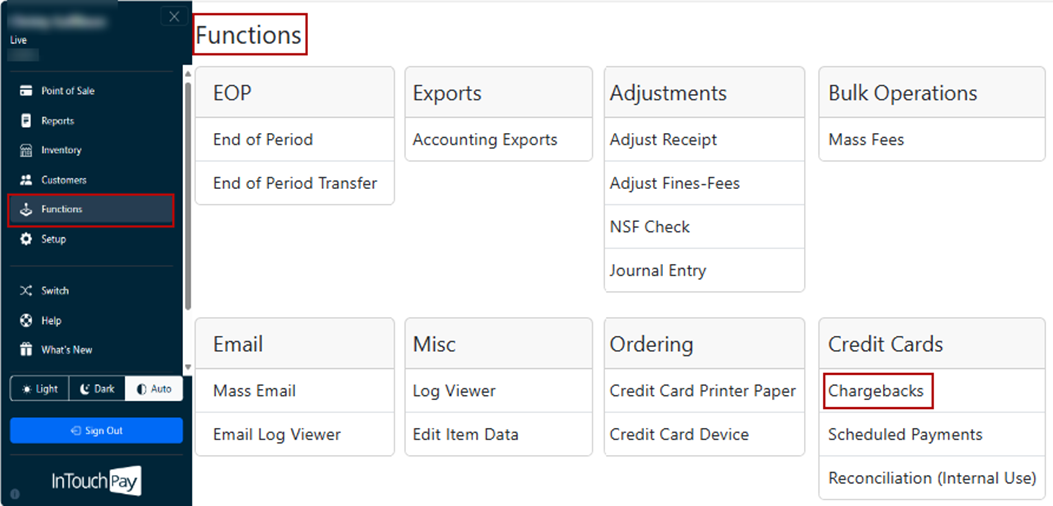
- Click the View button for details on a specific chargeback to access the Submit Documents button.
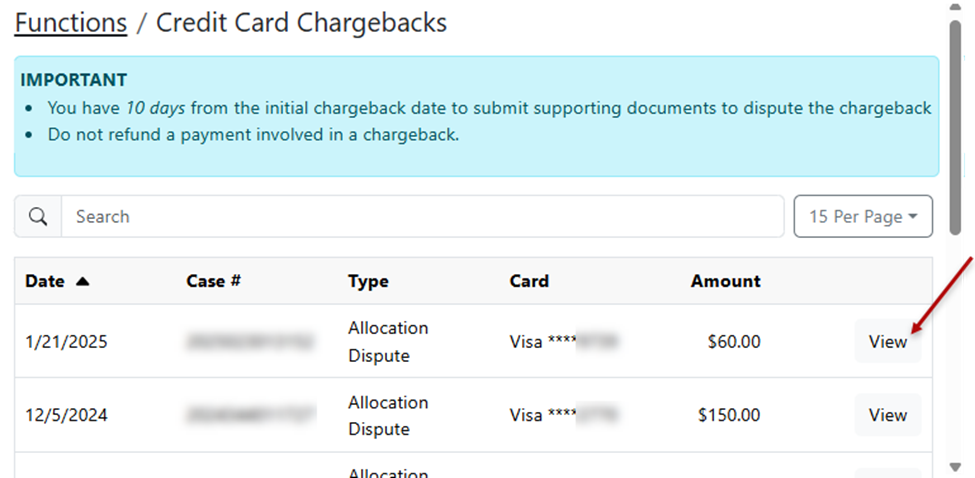
- Submit any documents, then continue to monitor status updates from the Merchant Dashboard.

Contact support at support@intouchreceipting.com for additional guidance if necessary.
Can you export data from the Merchant Dashboard?
Yes, you can export data to CSV format for further analysis. This is useful for detailed reconciliation and record-keeping.
How can you handle user permissions and access levels?
You can create and manage user accounts, assigning specific permissions and access levels based on roles. This allows you to control who can view and edit different sections of the dashboard.
Can you explain the funding section and its components?
The Funding section provides details on settlements, fees, chargebacks, and reserves. Each entry is associated with a specific MID and includes a reference number for easier reconciliation.
How are reserves managed in the Merchant Dashboard?
Reserves are funds held in a separate account due to account setup or risk management issues. The dashboard displays reserve amounts and any changes to these amounts over time.
What does the "CP" batch number prefix mean?
The "CP" batch number prefix indicates a consolidated deposit made up of several individual settlements. This helps simplify bank reconciliation by grouping multiple transactions into a single deposit.
How can you identify specific transactions or batches using the terminal ID?
The terminal ID helps identify the specific terminal or lane where a transaction was processed. This is useful for troubleshooting and understanding which terminal was used for transactions.
What information is available for dispute handling?
The Merchant Dashboard provides status updates for disputes, including the date filed, type, and status. Detailed information is available through the ARN link provided for contesting disputes.
What are the steps for processing chargebacks using the ARN link?
To process chargebacks:
- Use the ARN link in the Disputes section to upload supporting documents.
- Monitor the status updates within the dashboard.
- Refer to documentation or contact support for detailed steps.
How can you get updates on the status of disputes?
Status updates for disputes are available in the Merchant Dashboard under the Disputes section. You can also set up email notifications to receive updates.
What should you do if you encounter issues with searching for order IDs?
Ensure you are searching within the correct month. If the problem persists, export the data to CSV for further analysis. Contact support if issues continue.
How can you add new users and manage their permissions?
You can create and manage user accounts in the Merchant Dashboard under the Admin Portal, assigning specific permissions and access levels based on roles.
Is the Merchant Dashboard mobile-optimized?
Yes, the Merchant Dashboard is mobile-optimized and can be used on smartphones and tablets, providing flexibility to manage payment activities on the go.