The Customer Portal (formerly called TouchBase) is the destination parents and/or guardians can log into, using their district issued email address, to see all things related to their student. They can pay fines/fees, purchase school related items, make donations, etc.
TABLE OF CONTENTS
- Customer Portal Setup and Management
- Item Category Setup and Management
- Online Item Management
- Additional Option Selection Descriptions
Note: Your User Role determines your access to setting up and making changes in the Customer Portal. There are three sections that are driven by User Roles: Setup (formerly called District Management), Item Categories (formerly called Site Management), and Sign In As Customer. All of these options are found by clicking the Portal dropdown on the Setup tab under the Online header. Your User Role must also allow for placing Items online. This option is found by clicking the Edit Settings dropdown on the Inventory tab under the Items header.
Customer Portal Setup and Management
- From the Main Menu, select Setup.
- Select Customer Portal under the Online header.

- Setup (District Management)- Setup controls all global site settings. Below is a list of all available setup functions and what each section affects online.
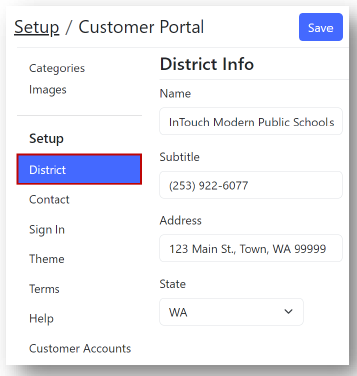
- District- Controls the name, subtitle, and address for the site.
- Contact: Controls the listing and information in the global "Contact Us" link.

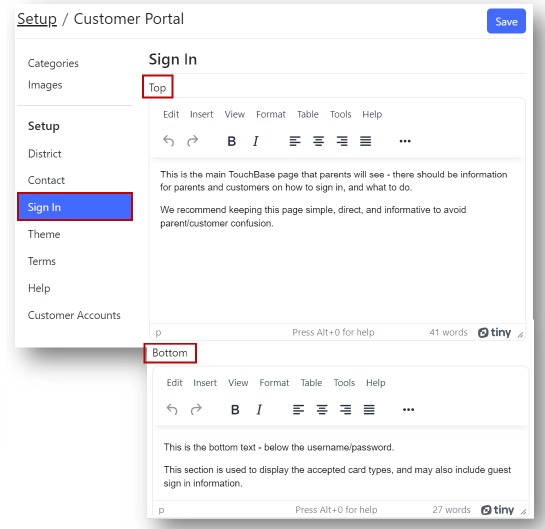
- Sign In
- Top: This section's content is displayed on the main Customer Portal page and can include both sign in instructions for parents and guests, and site-use tips.
- Bottom: Used to display guest sign in instructions and accepted card types.
- Theme: Edits the overall site color scheme, link colors, and logo.

- Terms: These Terms and Conditions can be our InTouch boilerplate messaging or can be set by the district.

- Help: This section is used for frequently asked questions and can also use our InTouch Boilerplate messaging or be set by the district.

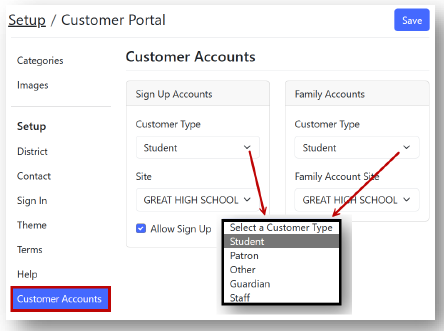
- Customer Accounts
- Designate if Guest Accounts are allowed/disabled, and what type of account can be created.
- Designate the InTouch site where Guest Accounts will be assigned.
- District- Controls the name, subtitle, and address for the site.
Item Category Setup and Management
The Categories section controls the parent-facing elements of the Customer Portal including Categories and Images. Item Categories are an important component to the Customer Portal and are required prior to Items being published online. Item Categories organize and sort items so that customers have a clear and defined experience online. It also allows for easier navigation by preventing one page from having too many items to scroll through.
Note: When setting up Item Categories, it is important to think simply and clearly. Remember that the customer is not going to understand much of the internal district terminology. The order of the Item Categories may be adjusted using the drag and drop feature.
- Select Categories.
Note: If you have access to multiple sites, select the Site to which you wish to add an Item Category.
- Select + New.

- Click to select the new Untitled Category.

- Complete the fields:
- Enter a Title
- Create a Heading
- Enter availability dates or leave blank
- Choose whether to limit one category item per transaction.
Note: You may remove a category by clicking the red Remove Item Category button.
- Click Save.
- Upload any images that you would like to be displayed with the items being made available on the portal.

Online Item Management
Adding and maintaining Items is crucial to keeping an interactive and useful purchasing portal for parents. Many Items should be made available for purchase throughout the year, so parents and customers continue to come back. Everything from sports and clothing to donations and fundraisers can be posted online.
- From the Main Menu, select Inventory.
- Select Items.
 Note: If you have access to multiple sites, select your site from the dropdown.
- Find the desired item by using the search field or by scrolling through the items.
- Select the Edit button for the desired item.

- Under the Customer Portal tab, check the Available Online box.
- Enter an availability date range, if desired.
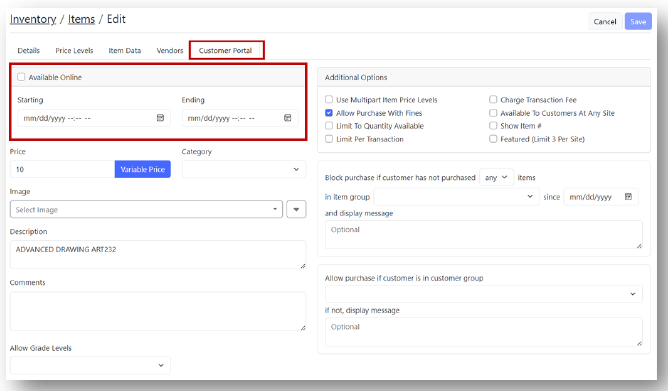
- Set the Price for the item or select Variable Price if customers will be allowed to enter their own amount.

- Select an Item Category.
Note: Items will not be displayed online if they are not assigned to an Item Category.
- Select an Image for this item.
Note: Any images uploaded during setup of the Customer Portal will be available for choosing. Selecting an image for your item is optional.
- Enter a Description for the item.

- Enter any necessary Comments.
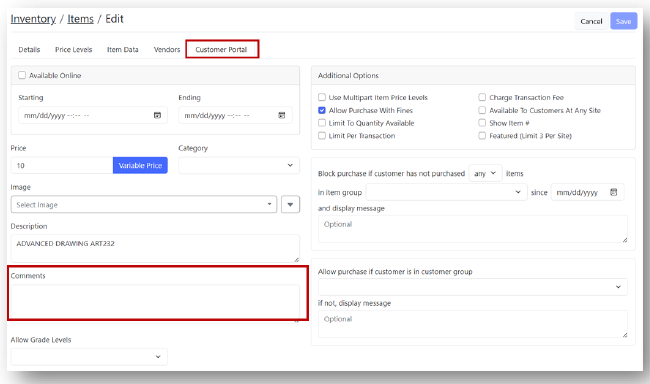
- If you wish to restrict the purchase of the item to specific grade levels, choose the grade(s) from the Allow Grade Levels dropdown.

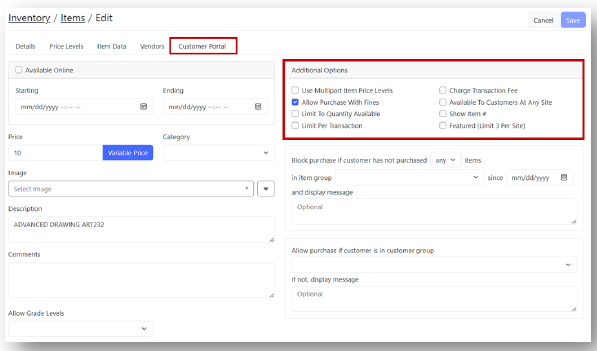
- Select any additional options (see next section for description of all selectors).
- Select any necessary restrictions that will control who is bale to purchase the item.

- Once your item settings have been confirmed, click Save.
Note: Your item is now available online under the Item Category selected during setup.
Additional Option Selection Descriptions
- Available to Customers at any Site: This allows any customer type from any site, or people from the community, to purchase an item. This is typically only used for Items like fundraisers, community sales, and donations.
- Limit to Quantity Available: This makes the ability to purchase the item contingent upon the quantity listed under the Details tab when creating and/or editing your item. Once the item quantity hits “0”, the item will say “Sold Out” online. The quantity is reduced both within Inventory and from the Customer Portal – any time that item is sold, regardless of method.
- Allow Purchase with Fines: This lets you control which items you wish to restrict the purchase of, if a student has an outstanding fine on their account. If you wish to drive more fine payments, the recommendation would be to leave this box unchecked. When the box is not checked, the customer will see a red “Pay Fines” button rather than a blue “Buy” button. This only applies to those with outstanding fines.
- Limit per Transaction: This does not control inventory or quantity available; it only controls the quantity of the item that can be added to the cart and purchased in a single transaction.
- Show Item Number: This function is primarily only used in Community Education applications, where the InTouch Item Number also matches the course number/course code, thus using the Item Number over the default Item Description, creating a tie between a course catalog and the Customer Portal (web store).
- Featured: Featured items are certain items that districts promote throughout the year or are otherwise needing to make readily available to customers. Common examples of this would be food service payments (if using the food service interface), donations/fundraisers, registration items, dance ticket sales, etc.
