The Accounting Export is the bridge between InTouch activity and your district’s General Ledger. This option allows you to export both cash/check and credit card revenue and adjustments into a file compatible with the business software your district uses.
Accounting Interface: InTouch Pay vs. InTouch Legacy
- InTouch Support converts your current format to one compatible with InTouch Pay.
- Export files contain the same data between InTouch Pay and InTouch Legacy.
- The Variables field (custom field) should be completed to include period, deposit memo, etc. (must be completed by InTouch Support).
- Some items in InTouch Pay have new names but function the same as in InTouch Legacy:
- Funds → Account Structures
- Variables → Custom Fields
- Download button → Export button
- Not Credit Card / Credit Card dropdown → Reconciliation Credit Card Batch Export tabs
- The Results tab allows you to view export results before downloading.
- Reports are available via tabs to download and save.
What to Know for Districts New to InTouch
- The InTouch team sets up a Universal Profile tailored to your district’s General Ledger system, such as Tyler, Visions, Munis, Qmlativ, Business Plus, Oracle, etc.
- InTouch needs the following information:
- Which financial software system does the district currently use?
- Does the district deposit money per individual site or all sites together?
- Is money deposited into one bank account or multiple bank accounts?
- For Tyler, Munis, and Oracle clients: InTouch requests a General Ledger import specification for setup.
What to Know About Infinite Visions Exports
There are some subtle differences between the InTouch Legacy and InTouch Pay Accounting Export process if your district was not using a Universal profile.
- The non-universal export format in InTouch Legacy defaulted to Excel and required users to name the files. In InTouch Pay, clicking the Download button generates an Excel file for each EOP/Terminal combination. The files automatically save to your Downloads folder and must be copied to a folder recognized by Visions Deposit Manager for importing.
- The file naming schema defaults to Location # - EOP # - EOP Date.
- InTouch Legacy created one file per EOP/Terminal combination and a separate file for adjustments. InTouch Pay includes all EOPs and adjustments in its export, based on selected criteria. The EOP Summary report can be used to confirm EOPs against the export totals displayed on the EOP Totals tab.
Tips for Reconciling InTouch to Your Bank via Accounting Exports
Credit Card Exports
Note
After selecting criteria for sites, funds, and dates, click Load to display credit card fundings. Then, click View to populate the Results tab.
- Compare the EOP Totals report or the Fund Totals report to the batch deposit in your bank.
- If InTouch Pay totals match what was funded to the bank, click Download, save the file in the required format, and import it into the General Ledger.
- If totals do not match, run the Revenue Detail by Batch or Revenue Summary by Batch reports. Include refunds in your review. If the reports match the funded amount, check that all purchases are linked to an account code.
- If discrepancies remain, contact Customer Support via https://intouchreceipting.com. Click the Support tab, then select Create a Support Ticket. Include the following details:
- Batch number and date
- Date and site/fund selection for your export
- Amount of discrepancy between InTouch and your bank
Cash/Check Exports
Note
After selecting criteria for sites, funds, and date ranges, click View to populate the Results tab.
- Compare the EOP Totals report to backup documentation from the school site or bank deposits.
- If the totals match between the bank and InTouch Pay, click Download, save the file in the required format, and import it into the General Ledger.
- If totals do not match, review backup documents from the site, the EOP Detail report, or the EOP Summary report to find discrepancies.
Troubleshooting
What to Check if the Accounting Export Results Are Blank in InTouch Pay
- Ensure the user has access to all sites and all terminals under Setup → User Roles.
- Check for non-reconciled receipts using the Non-Reconciled Receipts report. Set the date range from 7/1 to the end date included in the export.
- Verify that the selected date range is correct. Ensure both the start and end dates are accurate.
- Confirm that at least one Site and one Fund are selected.
- Check that all Variables fields are completed.
Accounting Exports (Formerly Called Accounting Interface)
Steps
- From the Main Menu, select Functions.
- Click Accounting Exports under the Exports header.

- Click View for the Universal profile option.

Criteria Selection
Under the Criteria tab:
- Under the Sites header: Check the box(es) for specific sites or select All (marked in blue).
- Under the Funds header: Check the box(es) for funds (formerly called Account Structures).


Criteria Options
- Select either Not Credit Card or Credit Card (formerly Reconciliation or Credit Card Batch Export tabs) from the dropdown (marked in blue).

- Select a Start Date and End Date from the calendar, or type in the date selections.
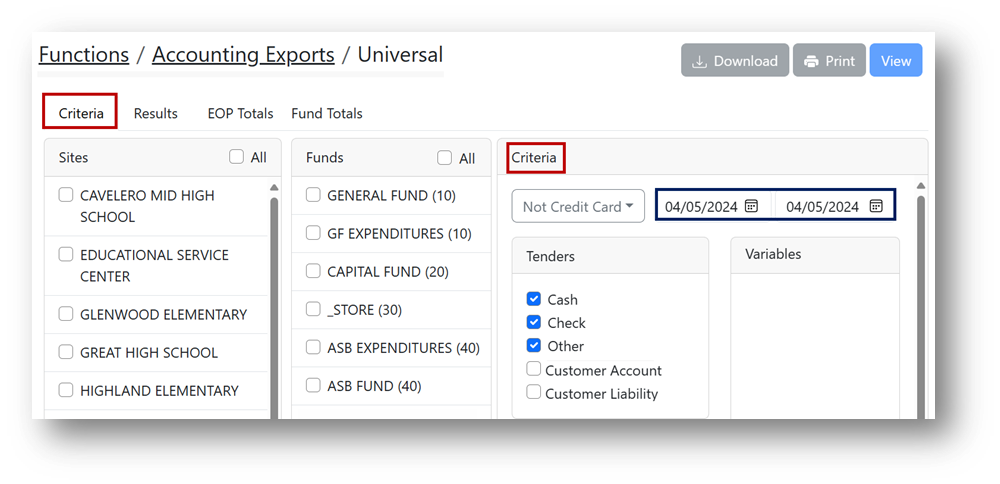

Note
The end date does not automatically default to the start date selection in InTouch Pay.
Tender Selections
- Under the Tenders header: Check the appropriate boxes for tender types.
- Under the Unaffected By Tender Selection header: Check any appropriate boxes.

Variable Fields
- Under the Variables header: Complete any fields if applicable.

Note
At this time, all variables must be added to the Accounting Export by the InTouch Support team.
Generating the Results File
- Click View to generate a results file.

Accounting Exports Reports
Steps for EOP Totals Report
- Click the EOP Totals tab to view the EOP Totals Report (formerly called the Totals Report).
- Click Print to print the report.

Note
This report displays all the EOPs in the export file, allowing you to compare them to paperwork from your sites.
Steps for Fund Totals Report
- Click the Fund Totals tab to view the Fund Totals Report (formerly called the Export Details Report).
- Click Print to print the report.
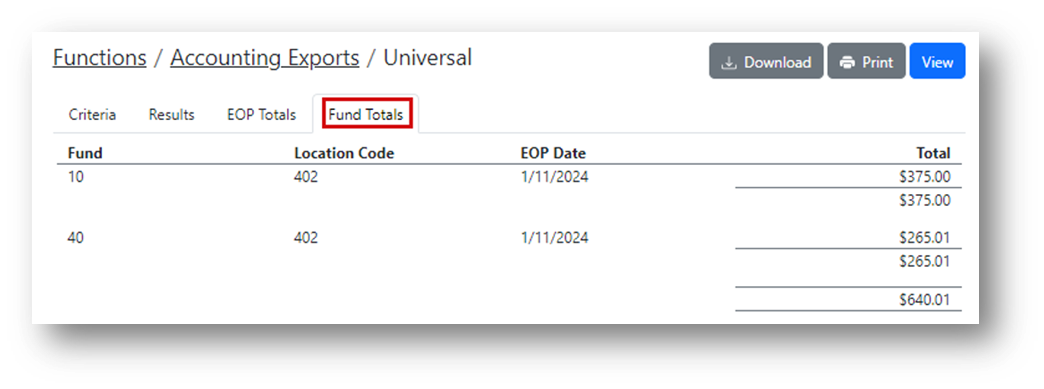
Note
This report displays the totals by fund for each EOP.